Adobe’s announcement of Adobe Photoshop Lightroom 2 coincided with their release of Adobe Camera Raw (ACR) 4.5. Both ACR 4.5 and Lightroom 2.0 were touted as being able to use the also new Camera Profiles (still in Beta). According to Adobe Labs, there are multiple improvements with these new Camera profiles.
- Updated Adobe Standard profiles which are supposed to improve color rendering in the reds, oranges and yellows
- Camera Matching which is supposed include profiles for popular manufacturers allowing better matching of what the camera’s natively produce
- The DNG Profile Editor which allows users to manually edit camera profiles
- The new DNG version 1.2 standard
How do Adobe ACR Profiles Affect Me?
Of most importance to me are the first two. My understanding with the Camera Matching is that these profiles should better match the JPG output of the cameras internal RAW to JPG converters with no customization of the settings. If you have messed around with your in-camera settings, these profiles will not match them. They will match the settings as if they had all default values. I also noticed on the Adobe FAQ page, they make mention that the Camera Matching profiles work with Canon and Nikon cameras. In fact, there are five profiles for Canon designed to match the Canon Picture Styles Standard, Portrait, Landscape, Neutral, and Faithful with their default settings. There are 8 profiles for Nikon cameras designed to match the Nikon Picture Controls for Standard, Neutral, Vivid, Landscape, Portrait, D2X Mode 1, D2X Mode 2, D2X Mode 3.
Installing Adobe ACR Profiles
The installation is outlined pretty well on the Adobe Labs page. They do make mention to close Photoshop and Lightroom if they are open. The installation is quick and when I opened Lightroom again, in the Develop module under the “Camera Calibration” section on the right side under the Camera Calibration panel, there are additional options for ACR.
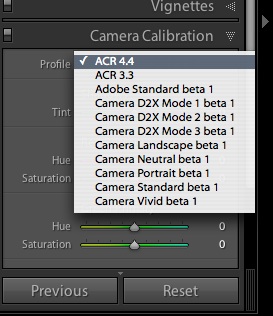
The first two options (ACR 4.4 and ACR 3.3) were there before installing the update. All the rest are new. I don’t have any Canon images, so I really can’t speak for how they will work or what would appear.
Using the Adobe ACR Profiles
One thing I particularly like about this setup is that I can change these profiles after the import of the RAW image. This makes perfect sense as these profiles are used to tell Lightroom how to display the RAW image. Therefore, the profile isn’t really part of the image and therefore, switching it around really just changes how Lightroom interprets the color bits contained in the actual RAW file. Cycling through each of the presets does indeed show different results. In fact, the new Adobe Standard beta 1 profiles does exactly what they say — better rendition of reds, oranges and yellows.
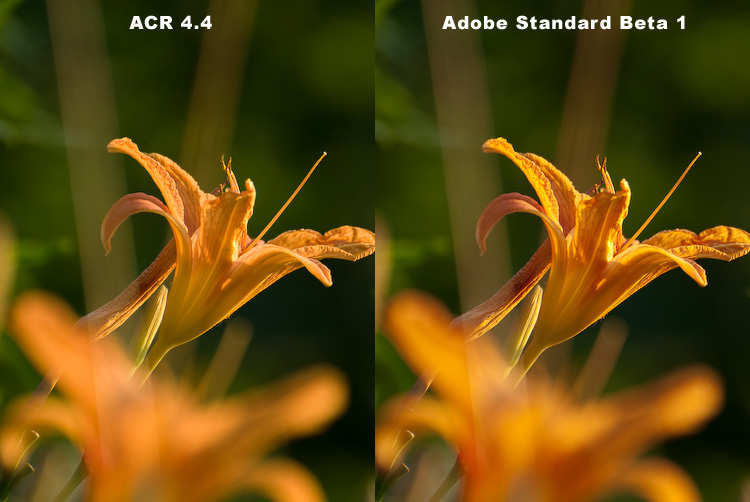
Clearly, the image I chose had strong orange / red tones to it to start with. But to my eye, the difference is very noticeable and I really think the new Adobe Standard is far better. The colors look much richer and less washed out.
Comparing the Profiles
In order to give a good idea of what each profile does to a raw image out of my Nikon D200 with no adjustment except for resizing / cropping. I omitted the “Camera Portrait beta 1” on purpose since the lily in the photo really doesn’t lend itself to skin tones. Perhaps I’ll do another post which deals more with portraits. I also omitted all the D2X profiles. Feel free to experiment with all of them.
Also, the following photos will show everything compared against the new Adobe Standard Beta 1 profile. I chose to do this for a couple reasons. First, it’s the new standard Adobe profile. Second, if I were to compare everything to multiple profiles (such as the old standard ACR 4.4), the images of this post would become difficult to examine due to sheer numbers. Finally, I really think I’m going to pretty much stop using the ACR 4.4 profile as the new profiles are that much better. Your mileage may vary.
The easiest way to view the following images for me is to click on one and let the lightbox open. If you move your mouse to either edge of the image, a ‘Next’ or ‘Previous’ button will appear. This will let you cycle through each image. Also, I’m viewing all of these on a color calibrated monitor. Please understand that if your monitor isn’t calibrated these may look very different.
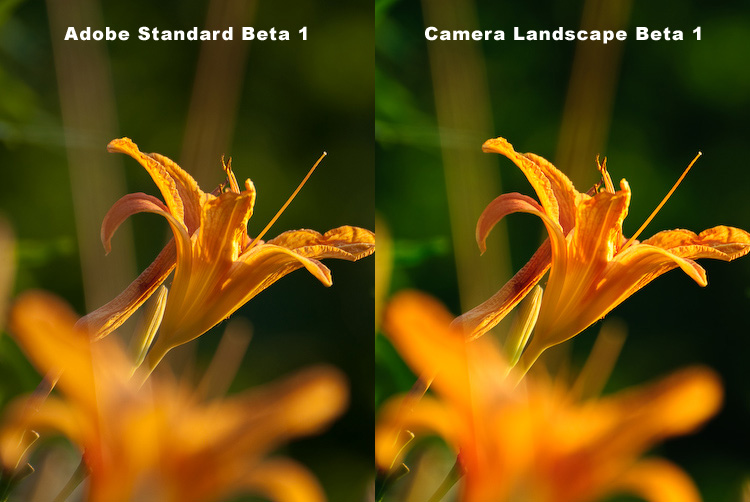
The Camera Landscape profile gives a bolder look. For the above photo, it makes the oranges more vivid and the greens less brown. For this photo, that works well, but for some others I’ve tried it gave an almost over processed look to the image.
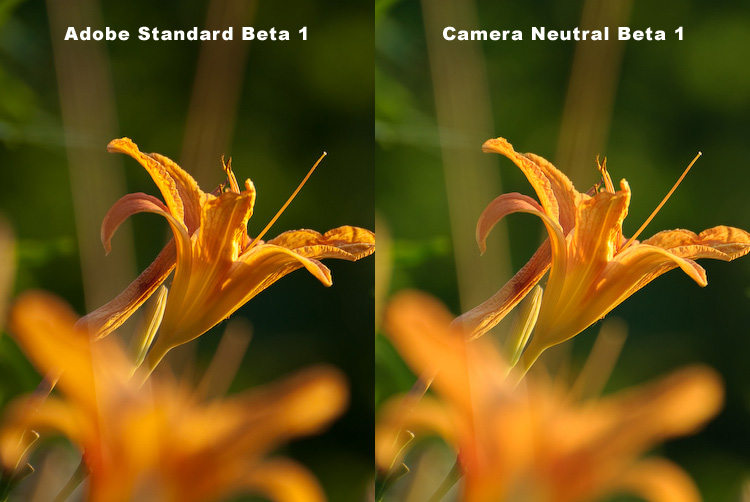
The Camera Neutral profile seems to give everything a more yellowish tint. For this photo, I really don’t think it works. Everything looks a bit washed out. This could be perfect for other images though. It’s all about flexibility!
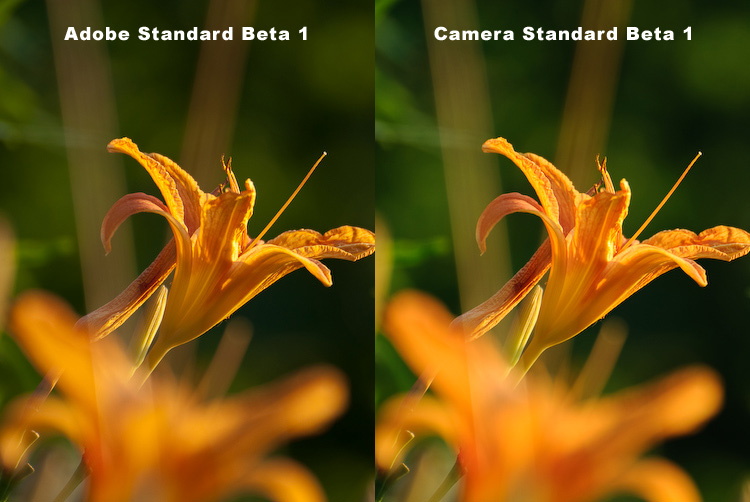
The Camera Standard is my favorite for this particular image. To me, it gives the most accurate representation of the colors in the image without making them look ‘too vivid’ or over processed.
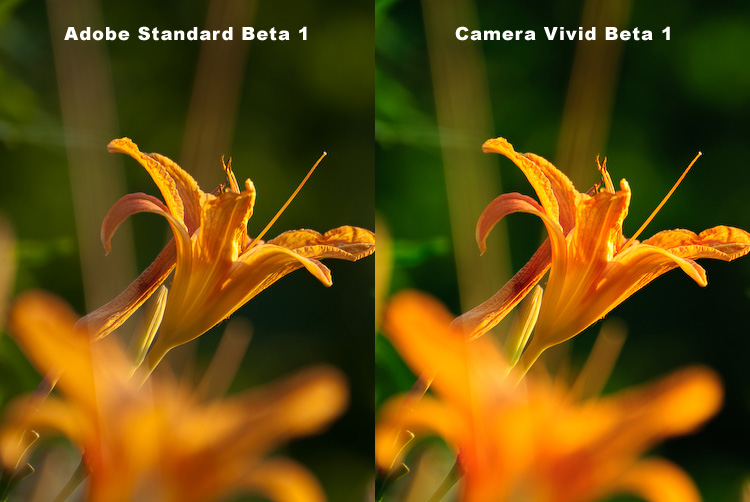
The Camera Vivid profile is just that. For those sunsets that just need more color, this might work perfectly. For this photo, it’s too much in my opinion. Either way, it’s a great way to bump up the colors without having to do any adjustments.
Conclusion
There are many opinions about which RAW format converter gave the best colors. For me, I think Adobe handled this in a fantastic way — letting the user choose what profile works the best for them. And since you don’t have to just pick one and stick with it, this whole system affords a ton of flexibility.
If you’re like me and decide that there is a better default setting for your camera, you can save the default develop settings. This is a little tricky as there are a few options. Please note: I have tested these instructions on a Mac. I have not tested them for a PC. First, go to Preferences and select the ‘Presets’ tab. Under the Default Develop Settings heading there are two check boxes we’re concerned with — ‘Make defaults specific to camera serial number’ and ‘Make defaults specific to camera ISO setting’. This allows the user to select if they want to use different default profiles for different cameras and even different ISO values.
Once you’ve this choice has been made, view a RAW file in the Develop module. Select the profile you want to set as default and from the Develop menu, select Develop->Set Default Settings. This will save your default profile as well as any adjustments which were made to it using the sliders in the Camera Calibration section.